Rust Repair on Sheet Metal: Expert Tips with Luke Merrill | MillerWelds

Rust Repair on Sheet Metal

Print Article
Share
Rust leads to the demise of millions of vehicles per year. Learn how to fix rust corrosion and prevent future damage with Miller partner Luke Merrill.


 luke merrill repairs rust using mig welding

Rust: the worst word that any car enthusiast or metal fabricator can utter. If you are located anywhere near road salt or the ocean, you are well familiar with this nuisance that wreaks havoc on cars. Rust is a reddish-brown iron oxide formed by the reaction of iron and oxygen in the catalytic presence of water and air, meaning that when iron is exposed to moisture or oxygen, oxidation occurs. Eventually, it will continue deeper into the steel and compromise its structural strength.


Diagram Rust


This is where metal fabricators come in. People have been fixing rust for hundreds of years. While I've only been doing it for about 10 years, I know how important it is to do it right so the repairs last. I have tried numerous techniques over the years, with different products and results. Below, I will explain each of the steps necessary to repair rust damage. (Note: Every metal-man (or woman) will have slightly different techniques and preferences, but the basic steps to repair rust will generally be the same.)

For this article, I am working on a 1964 Impala. It has some rust in the typical places, as well as rust that was accelerated by someone cutting out part of the fender lips to fit bigger wheels, then never sealing up or creating any sort of moisture or salt barrier for the exposed metal.


Impala

Impala


To start this project, I will be using 18-gauge cold rolled steel. I generally try to match the OEM metal as close as possible. Most vehicles pre-2000 use 16 –19 gauge steel, while post-2000 vehicles use 22–24 gauge steel. Older ones also have a better-quality, molecularly cleaner, purer steel, which lasts longer and is generally less susceptible to expansive rust than the cheap, dirty steel that car manufacturers use today.


Let’s Get Started:

1) Analyze and Plan

The first thing to do when tackling a rust repair job is to analyze where the problem areas are and what needs to be done. This can be especially challenging on a vehicle or project that someone else has already repainted, cut into or tried to do repairs on. It’s like opening a can of worms; you never know what you’ll get. This car was a perfect example of that. At first glance, it seemed like it was going to be a simple wheel lip repair and maybe a few small spots here and there, but once I started looking closer and cutting into the car, I noticed previous repairs that were covered with body putty in about a dozen spots. Many of these previous repairs were building rust from the inside out, which means they were not properly executed the first time. Therefore, cutting out all the subpar repairs and doing it right this time is a necessity.

Before you cut, you may need to grind any areas that look concerning. I especially look for any bubbles in the paint or evidence of body fillers used previously. You can do this with a sanding pad on any tool of your choosing. I will generally use an Eastwood SCT contour or a 3-inch grinder. But there have been times when I‘ve needed to use an 8-inch orbital to clean large areas. I like the SCT because it can be gentler on the sheet metal and will remove less of the already thin, rusty material. Once the areas are clear of all paints and fillers, it should be obvious what will need to be repaired.


Tip: Pocketed areas in the car’s design (such as rocker panels, door bottoms, fender bottoms, pinch welds, etc.) can hold moisture and organic material (leaves, dirt, insulation, etc.). These are areas of high concern to look closely at. A perfect example can be seen in the photo below of the rocker panel of this Impala — full of debris. This debris will hold moisture against the metal and exacerbate the rusting process.

Behind rocker 


2) Start Cutting

Once I have identified all the areas of concern, I start cutting. Where I cut is dependent on a handful of factors, the most important being what I will be replacing the rusty metal with. Suppose I am repairing with a “manufactured” quarter panel or fender bottom. In that case, I will use that manufactured panel as a template for cutting out the rusty panel on the body by laying it over the vehicle and marking it, following a pinch weld, or making body line measurements. It’s always better to cut and leave a little extra material that can be shaved down later to get a precise fit.

Sometimes, you’ll want to plan your repairs around the inner structure of the vehicle. This is especially important if you are going for more of a “metal finish” higher-end repair, where you may want to get to the backsides of all the welds to hammer/stretch them back out. It’s also important to know that you will want to repair a few inches past the visible areas of rust, because rust does spread and will make the panel weak even if it’s not visible to the naked eye.

For this project, I am not using any manufactured quarter panels, fender bottoms or patch panels. I will be making every part by hand. So in that case, there are three viable techniques for cutting out rust. Any of these three options should cover any sort of repair you will have to make. Sometimes one way works better than another.

a) Replicate Piece After Cutting Out Rust:

Mark and cut a few inches around the damaged area and save that rusty cut-out piece for a template to trace around and replicate with new metal. Square corners are generally easiest for replicating, so mark square corners for your cuts. 


b) Replicate Metal Before Cutting Out Rust:

You can also make the patch panel first, again extending a couple inches past the damaged area. Lay that over the area that needs to be repaired, Dykem (layout dye) and scribe the area off, cut it out and file to fit.


c) Paper Template After Cutting Out Rust:

Cut out the rusty metal a couple of inches from the visible rust, make a paper template of the part needed and reproduce it in steel. This works best when the panel is too far gone to cut off and use as a replication template or when you can’t tell how the part was originally formed and you need to guess at the size, alignment and shape.


What you use to cut out the rusty metal can vary. I most often use a 4.5-inch grinder and 1/16-inch cut-off wheel, but sometimes I use a pneumatic body saw or a die grinder with a smaller, thinner disc. It depends on the type of cuts you will be making and the precision necessary.


3) Fabricating Replacement Panels (If Applicable)

Now, fabricating the replacement panels can be a bit tricky at times. If you are not experienced with metal shaping or the basics, sometimes it’s easier to buy premade panels if you can get them. For this vehicle, it was not possible to get the panels for the small areas I needed (without buying entire new skins), so I just made them. Often, it comes down to what’s cost- and time-effective and what skills you have. I always start with a paper template of the area first, then build my panel based on that. It is a lot easier, faster and cheaper to make the part out of paper first, then transfer it directly onto your steel. Plus, you only have to cut it once.

Below are some photos of some of the equipment that I use the most for projects like this. Obviously the amount of tools or the quality of tools will vary, but these are the things that I like and often use. I have built a lot more with a lot less; sometimes you have to get creative!


Tip: Any rusty braces, inner pieces or supports should also be replaced at this point. Here, I am cutting out and fabricating a new support. It's not an exact replica, but it serves the same purpose.


4) Prepare the Inside/Backside

The longevity of your rust repair job will be dependent on how well you prevent future rust from redeveloping in the problem area(s). Now that the rusty metal is removed, you can likely see inside the panel and get to the back of areas that were unreachable before cutting out the rust. In those areas, I use a wire brush and a wire wheel to prepare surfaces for protective coatings. Any loose scale, loose paint or rust should be removed during this process. Then clean it with any sort of solvent you can (I use brake cleaner or lacquer thinner). Finally, you can apply paint to the backside of your damaged areas. I typically use black POR-15 rust preventive paint (part # 45408) or weld-thru primer (part # 41418) anywhere that I can get it sprayed or brushed on. For areas that I cannot, I use an Eastwood Interior frame paint (part #12515Z), which comes with a small hose and a 360° nozzle that coats the insides of rockers, frames, fenders, hood structures, etc. Also, now is the time to paint the backside of the new replacement panels with one of the same products.


It’s important to note that during the next step (welding in your panels), some of the coating will get destroyed, but there is really no way around that; at least most of the area is protected against future rust. If you can get to the backsides of the welds after welding and grinding your replacement panel, wire brush the seam clean and coat it with any sort of paint or primer that you can.

Tip: Some people, including myself, also add fluid-film coating as another layer of protection inside the typical rust-prone areas of the vehicle. However, it can sometimes seep through and create issues with exterior paint adhesion later, so I recommend using it, but only AFTER your exterior paint job is finished.

5) Welding the Panels

Numerous welding processes can be used to affix your repair panels: MIG, TIG, arc (stick) or oxy. Some are better suited than others, however. I prefer MIG welding for repair jobs or pieces that won't require much, if any, hammer or shaping work afterward, because it's the fastest and easiest. But if the panel needs to be perfectly metal finished or shaped, TIG welding is the best option as the hammering work is softer and will end in a better result. This all depends on the level of quality of the final product you want. For most rust repair jobs, MIG welding is just fine and more straightforward for a novice metal worker. Oxy acetylene would be my third choice, and arc welding would be my fourth choice.

welder setting

welder welding

welder welding


As with welding on any metal, shrinkage and warping will happen. The thicker the metal, the less noticeable the effect. This can be a very important consideration for rust repair on a car's body. If you burn it in full boar without any thought or control, you will have a poor result in the final product. In the previous “Making Metal” article, I discussed heat control in sheet metal welding. If you have not yet read that article, I highly recommend doing so. It will give you a ton of information about heat control, which is essential with these sorts of projects.


In a nutshell: Turn your welder as low as possible, while still getting decent penetration. I use a Multimatic® 220 AC/DC for MIG/TIG welding every day and I love it. The Auto-Set™ functions for material thickness are remarkably accurate, but when in doubt, do a test panel with welds and adjust until you feel you have the least amount of heat possible while still getting enough penetration. I rarely do full “beads” on steel body panels. It creates a lot more warpage/shrinking and allows for burn-through if you’re not as experienced at welding sheet metal. Your best bet is to stack tack welds slowly and evenly around the panel while making sure your part doesn’t get super-hot. Using the smallest diameter wire you can find (generally .023 inch) will also help keep excess heat down. I tack weld the replacement panel in four to eight spots spread over the entire panel, then go back, stack a few tacks at a time, and rotate around the panel. Doing it evenly will create the least amount of warp.


6) Grinding and Metal Finishing

The specifics of the grinding process will depend on if you MIG, TIG or oxy weld. TIG welding generally requires the least amount of grinding. For most non-TIG welds, I start with a grinder with either a hardstone or 40 grit flap wheel to get the brunt of the welds down. Then, transition into a pneumatic grinder with an 80 grit 3-inch pad until it's relatively smooth/straight, making sure not to burn too much into the parent metal or get the panel so hot that it shrinks (warps). For TIG welds, I start directly with the 3-inch pneumatic.


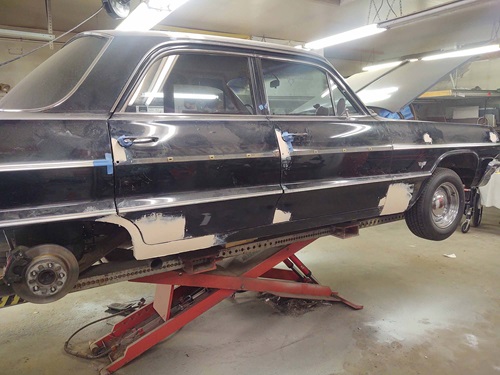
Then, I will hammer or reshape anything that became out of whack with the welding and grinding. As I mentioned before, shrinking is inevitable with any welding process. How much it shrinks and how to correct it is the question that you will need to address. This correction process can take five minutes or five hours. It all depends on the quality of the metal that you want under your bodywork. The closer it is to straight and perfect, the less filler it will take, but the more time it also takes. It’s a perfectly correlated relationship between time and quality. For the average build, I like to keep it less than 1/8 inch out of straight for any low or high spots in the metal. It’s easier to fill lows with body putty than to correct highs with body putty.


Hammer Dolly T dollies


Metal Done 1

Metal done 2


7) Bodywork

Whole books could be written on the specifics of bodywork, so I'm not going to go extremely in depth here. The most important thing is the metal prep, good filler materials and good sanding blocks.


miscellaneous products


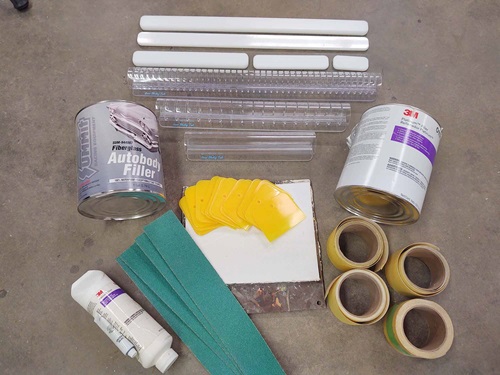
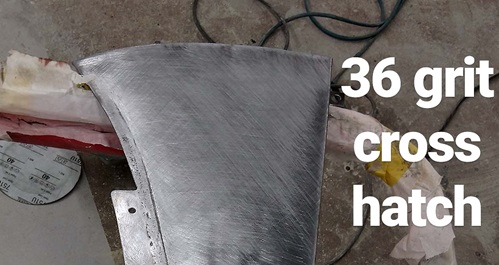
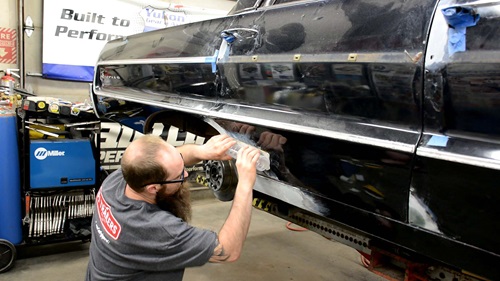
For metal preparation before filler, you want to make sure your metal is as clean as possible, is free of contaminants and has some texture for the products to stick to. I first start with a 120 grit pad on a 3-inch grinder or SCT contour to remove any major paint, contaminants or rust. Then, I use 36 grit sandpaper to heavily crosshatch the area by hand. You want the surface to look and feel rough. Finally, I use a wax and grease remover or lacquer thinner on a clean rag to completely clean the metal before applying filler or any other product. The crosshatching allows for the most robust mechanical adhesion of the filler. The solvent cleaning provides the best chemical adhesion of the filler. Both are important for the longevity of your repairs.


Crosshatch           


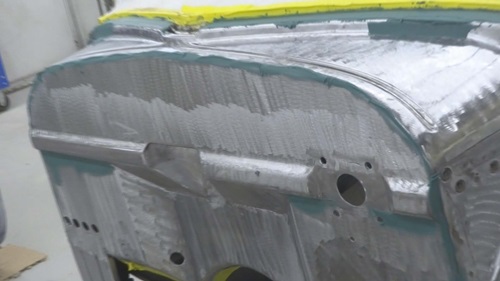
With rust repair, it is crucial that you "waterproof" your repair. For the first round of filler, I use the Summit Racing short-strand reinforced filler (also known as Duraglass) on every weld seam or panel replacement seam. This will help keep water from entering through the backside of the panel and creating moisture pockets between the paint and the metal, which will eventually rust again. Pressing Duraglass into all the seams is essential. It doesn't take a whole lot; make sure any pinholes or anywhere that water can get is filled with the Duraglass.


Duraglass Seams 
Duraglass Seams 2


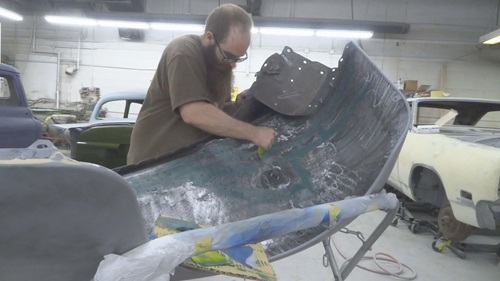
From there, you will likely need to do a skim coat of lightweight filler. Any hotrod builder or shop that tells you they don’t use ANY body putty is simply lying. There's no shame in it! It's a great tool when used correctly and to perfect a repair in a cost- and time-effective way. Again, don't use over 1/8 inch; it will be fine.


Tip: Lightweight filler is not waterproof; if it gets wet, it will soak through to the metal and rust it from the inside out. So make sure it doesn't get wet once applied.


Bondo Skimcoat 1 Bondo Skimcoat 2


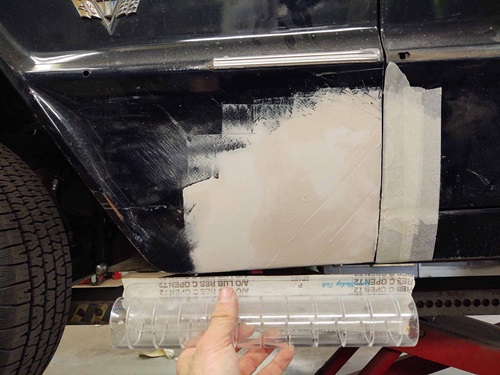
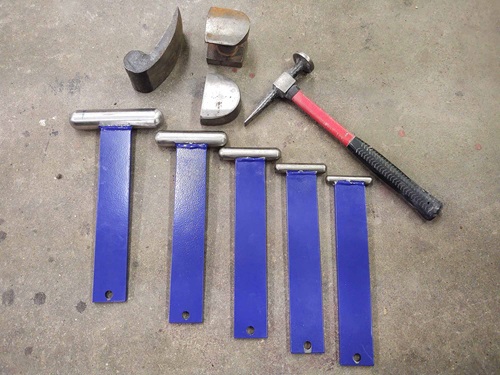
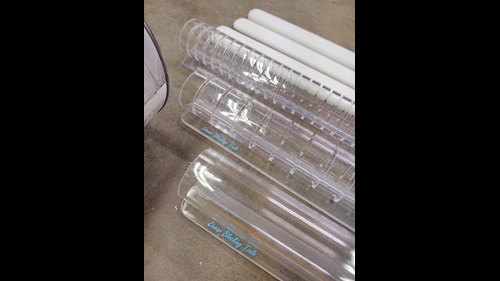
The sanding process generally starts at 60 grit and works up to 320 grit. I use Linear Blocking Tool blocks along every step. There are multiple different blocks that I use, but they all have their purpose and their place. For the smaller repairs on this particular job, I primarily used the 8-inch straight block and the smaller wet sanding/detail blocks.


a man sanding the side of a carBlocks 


8) Prime and Paint or Wrap

This step has a ton of variability in preferences/specifics as well. The important thing is to get all of your bodywork covered and protected so the metal underneath doesn’t get exposed to moisture, salt or the elements. This is another topic that an entire article could be written on. Use decent products and take your time. For filler (2k) primer on small areas like this, I like the Eastwood roll-on primer system. It's nice not to worry about overspray or masking everything for quick, small repairs. I use Summit Racing paints for the actual color on larger repairs. Prime it, sand it, paint it. This car is being wrapped after my repairs are done, so I didn’t spend a ton of time doing a perfect color paint match on it. Instead, I just got it primed well, then used the closest rattle can I could find to add another layer of protection.


9) Enjoy

Now! DRIVE THAT THANG! Enjoy your handiwork and the extra years of life you’ve just added to your vehicle!


Impala car on a dirt road


10) Check out Tinman 2 Kustoms for more tech, hotrod content and entertainment!

www.youtube.com/tinman2kustoms

www.facebook.com/tinman2kustoms

www.instagram.com/tinman2kustoms

Published: