Executive Summary:
Selecting the proper engine driven welding generators, plasma cutters and other associated repair tools will help you prevent downtime by fixing repairs right the first time.
- Engine drives expertly run plasma cutters and offer great carbon arc gouging capabilities.
- Bobcat welding generators provide superior Stick welding performance.
- Welding generators with a constant voltage (CV) output are ideal for flux cored welding.
- Welding generators eliminate need for stand-alone generators, saving space for other tools on service trucks.
Five Tips for Field Repair
Equipment repair eats at your bottom line worse than abrasive sandstone at an excavator bucket. Every minute your machine is down to replace teeth or digging edges is a minute of lost time, and minutes turn into hours. While sometimes necessary, you can minimize downtime by having the knowledge and the right equipment on-hand to cut, prep and weld damaged and worn sections of steel quickly. From teeth and dozer blades to larger items such as dump truck beds and equipment trailers, preparation when unsuspected failures occur—which includes having the right engine-driven welding generator on your maintenance truck—makes the difference between a profitable day and a day of lost profits.
Step 1: Cut out Broken Steel with Oxy-fuel, Plasma or Carbon Arc Gouging
The first step in repairing any broken piece of steel is cutting out the damaged piece. Most contractors have oxy-fuel equipment readily available for cutting, brazing, soldering and preheating weld surfaces. Gaining in popularity, plasma cutters offer lightweight portability and efficiently run off most engine-driven welding generators, cutting up to 3/4 in., with 10,000 watts or more generator power. Engine-driven welding generators also feature carbon arc gouging as an option, though capacity varies greatly between units of different size. Each option can work, some faster or better depending on the specific situation. Most contractors use what they have, including a combination of processes.
When repairing the damaged section, make sure to remove all rough edges to ensure proper fit up with the replacement piece, which ensures faster repairs. Whether flux cored or Stick welding, grind and remove any rust or oils that exist where the two pieces are to be joined. While Stick and flux cored welding are somewhat forgiving of an unclean surface, any contaminates may negatively affect penetration and lead to cracking or lack of fusion. Extra time spent on grinding and cleaning before prevent costly failures later.
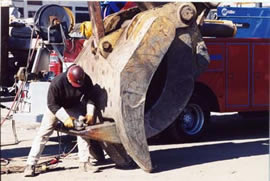 |
| For running tools like this grinder, Miller’s diesel engine-driven welding generators feature 5,500 to 20,000 watts of generator power, depending on the model. |
Step 2: Match and Cut Replacement Steel
Constructed out of abrasion resistant steel, your engaging tools (demolition grapples, excavator buckets, etc.) should be replaced with an exact match in strength. Other components might be constructed of different alloys. Each application varies in terms of level of hardness, wear, resistance and tensile strength, so consult your equipment dealer and stock up on the matching steel. An exact match guarantees weld quality and longevity. A steel of lesser strength leads to premature failure and more downtime.
Cut your steel to its required size and bevel the edges at about a 30-degree angle. This angle allows for better penetration and is done effectively with an oxy-fuel or plasma cutting system. Don't bevel the entire edge; leave a small portion, about a nickel's width, at the bottom of the groove to support the heat of the arc.
Step 3: Preheat to Eliminate Cracking
Fit the replacement piece into place and double check for any improper gaps and/or dirt, which can weaken the weld. After achieving proper fit, preheat the welding surface using your oxy-fuel torch outfitted with a special "rosebud" tip that widens the flame. This preheating removes hydrogen that leads to cracking caused when an extremely hot welding arc is applied to a cold piece of steel. Preheating temperatures (250 degrees F is common temperature) vary based on the material welded. Consult your welding supplier for specific heating instructions. Use a temp stick, sometimes referred to as a heat crayon, to check the heat. This marking changes colors at different temperatures and lets you know when a specific temperature range is reached. Now, it's time to weld.
Step 4: Electrode Selection and Welding Technique
Stick welding remains the most popular process for field repair, as it requires less equipment and decreases the effect of wind.
Common electrodes used in Stick welding are 6010, 6011, 6013, 7018 and 7024 (each has specific properties) in diameters from 1/8- to 5/32-in. Depending on the abrasion resistance of your steel, you might even want an electrode with a higher tensile strength, such as 11018-MH4R. Each of these electrodes offer all-position welding capabilities (except 7024) and provides compatibility with the high tensile strength steels you encounter in the field. Consult your welding supplier for specific recommendations if you are unsure.
A basic and general sequence may be as follows: Start out by making a root pass with a smaller diameter (1/8 in.) electrode. Popular for the first pass, a 6010 electrode lends a measure of flexibility at this stage of weld, and works well on open-root joints. Make the next passes with a larger diameter (5/32 in.) rod to deposit weld metal faster, as well as a rod with different properties. For example, a 7018 rod is popular for its high strength. Make repeated passes until completion, and always remember to grind away the slag (protective flux coating) in between each pass.
Step 5: Select a Welding System
Selecting the right machine is based largely on the diameter of electrodes used. A 1/8 in. electrode welds at up to about 145 amps, while a 5/32 in. rod experiences optimal performance at perhaps 180 amps. Therefore, a welding generator with a 100 percent duty cycle at 250 amps, such as Miller's Bobcat™ 250, offers more than enough welding power to fill most Stick welding needs. The Bobcat's Tri-Cor™ technology, improves 7018 performance with a smoother finish and less spatter, making these machines ideal for field repair.
If you carbon arc gouge on a regular basis, you need to size your machine to the carbon diameter you want to run. As an example, for maximum gouging performance, the Bobcat 250 provides 275 amps for 3/16-in. carbon, Miller's Big Blue® 400 is rated at 5/16-in. carbons and its Big Blue® Air Pak is rated for 1/2-in. carbons.
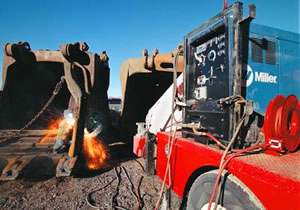 |
| For heavy duty service trucks, no other unit matches the versatility the Big Blue Air Pak deluxe model: 750 amps of multiprocess welding power, 20,000 watts of generator power, 100 PSI at 60 CFM (enough compressed air for two arcs, as shown here) and battery charging/jump starting capabilities. |
If you perform field repairs with the flux cored process, a welding generator with constant voltage (CV) output provides far superior wire welding performance than a constant current (CC) machine. A CV output is also necessary for short circuit MIG welding for general fabrication. Amperage requirements vary based on the type and diameter of wire you are using, but 250 to 350 amps is sufficient for most applications.
Welding manufacturers also reduced the physical size of machines, made them quieter and added more capabilities for maintenance trucks. Most contractors benefit from the dual welding/power generation functions of engine drives like the Bobcat 250. These machines save space on your maintenance truck by eliminating the need for a stand alone generator, as they have the power to run your grinders, drills, chop saws, lights, air compressors (to run air tools) and even microwaves to heat up your lunch. The Bobcat provides 10,000 watts of Accu-Rated' generator power (Accu-Rated means that you get 10,000 watts of usable peak power. This especially helps when starting motors under load).
The Bobcat 250 design directs airflow out of the top of the machine, eliminating the chance of airflow being blocked when the unit is truck mounted and decreasing the chances of hot air re-entering the unit. This design ultimately lowers internal component temperature and extends the life of the machine. This problem has plagued some truck-mounted units in the past.
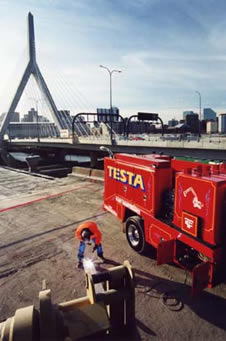 |
| Service truck owners select the Bobcat 250 more than any other welding generator. A newly redesigned airflow keeps the unit running cool, even when mounted in restricted spaces. |
Some welding generators in the 250 amp class, including the Bobcat 250, can be ordered with a battery charging option that replaces the AC welding output (rarely used for repairing heavy equipment). While this option adds about $500 to the purchase price, a battery charger is worth its weight in gold if it prevents downtime.
For heavy-duty repairs and space savings on maintenance trucks, fleet managers consider an option like the Big Blue Air Pak. This unit features a welder, generator and an air compressor (a built-in rotary screw compressor from Ingersoll-Rand that generates 100 PSI at 60 CFM). The "deluxe" version offers a battery charging option so powerful it jumpstarts equipment with 24-volt batteries; the unit also delivers 20,000 watts of generator power when not welding.
Look at how much space you have on your maintenance truck(s), weigh your needs and make your selection between smaller and larger engine drives. Some contractors opt to designate a portion of their trucks as "general maintenance trucks" and equip them with smaller engine drives, while designating others as "heavy duty repair trucks" and equip them with more powerful and versatile units.
Spending time now to investigate engine drive options will save you time when it counts most: when a critical piece of machinery sits idle waiting to be fixed. Using the tips outlined here—and the right engine drive for the application—will guarantee that your critical machinery starts making money for you sooner than later when field repair is necessary.