 |
|
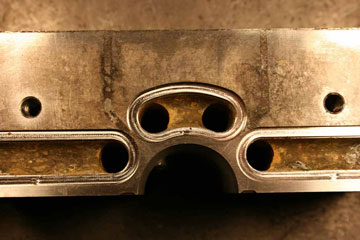
Matsuo machined the seal of these 6061 aluminum blow mold water channels was to remove corrosion and then built it back up with 4043 aluminum.Tool and die repair with gas tungsten arc welding (GTAW, or TIG) is a niche specialty critical to the performance of tools, dies, molds and inserts. The TIG process is used because operators can finely control heat input and the amount and location of weld metal deposited. Tool and die welding typically involves building a damaged surface up past its original plane so that it can be machined its original tolerances.
|
Companies like Matsuo’s Master Craft Welding Company, Inc. of Santa Ana, Calif., have perfected their TIG techniques. The following paragraphs discuss Matsuo’s techniques and the intricacies of tool and die welding repair.
Pre-Weld Analysis
Matsuo first determines the parent metal’s type and grade. Most of his customers know the alloy used to build their tools and dies, but others are uncertain or rely on assumptions. Matsuo performs Rockwell tests on the parent metal, using the hardness rating to determine the alloy type and grade. On the rare occasion when he cannot identify a material through visual inspection or Rockwell testing, he sends it to an independent lab for analysis.
Before developing a welding “plan of attack,” Matsuo studies a tool’s composition and configuration to determine how the stress of welding will affect the tool. He cautions others not to take shortcuts in pre-weld preparation just to get production equipment up faster.
“You have to be diligent. Analyze the part to determine what you can do,” he says. “You can’t just throw a weld on anywhere. Going through the proper procedures prevents mistakes that could lead to cracking and scrapping a part.”
Cleaning and Preheating
Master Craft cleans every part prior to welding, whether it’s an insert with a minor nick or a mold with corrosion around its cooling channel. Cleaning can be as simple as wiping the part with acetone/M.E.K. solution or quickly grinding and de-burring it. It can also be as complex as machining the part to remove all traces of contamination. Aluminum particularly needs to be void of any dirt or corrosion.
 |
|
Matsuo stresses the importance of keeping the filler rod in the weld puddle to prevent the rod from oxidizing and contaminating the weld.
|
“It’s like oil and water,” Matsuo claims. “Any dirt or corrosion will create holes and an aluminum part will fail.”
Some delicate parts pose problems, particularly those used in plastic molding applications. Plastic settles in areas that cannot be effectively cleaned with acetone, and mechanical cleaning could damage the delicate mold. To clean these parts, Matsuo preheats them to a temperature that burns off the plastic, typically 300 to 400 degrees F. He cautions others to understand the characteristics of plastic and the parent metal prior (e.g., melting points) prior to heating to avoid further part damage and to ensure the plastic burns off.
“Burning off plastic is not an option I prefer, but sometimes it’s a necessity,” says Matsuo. “The important thing is to make sure that heat won’t change the parent material’s hardness, molecular grain structure or other critical characteristics.”
Some components are ready to weld immediately after cleaning, but others require preheating in a kiln.
“With 7075 grades of aluminum and high-temperature steels (such as A2, D2, O1 and S7), the parent material is more prone cracking,” he says. “In these instances, I preheat the part and—most importantly—I keep the part at the required temperature while welding. If the part’s temperature drops too low, the ambient air can cool the part, air-harden it and cause the part to crack.” To maintain temperature while welding, Matsuo uses a common hot plate.
Torch & Consumables Selection
Matsuo uses a hard-bodied, water-cooled torch for conventional TIG welding and a hard-bodied, air-cooled torch for micro-TIG welding. The water-cooled torch reduces torch size for better ergonomics, yet it keeps the torch cool at higher amperages. The air-cooled torch is used with micro-TIG because this low-amperage application does not heat the torch much, and because air-cooled torches cost less.
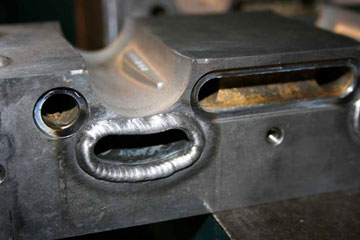 |
| The finished weld bead shown here will be machined back down to its original dimensions to create a seal at the mold’s parting line. |
To prevent any chance of shielding gas escaping through a puncture in the body, Matsuo specifies hard-bodied torches, such as Weldcraft® WP-20 torch, rather than “soft body” torches made from a soft plastic or elastomer. While rare, punctures may allow the atmosphere to be sucked into the weld and could lead to contamination.
To improve shielding gas coverage, Matsuo always uses a gas lens. A gas lens replaces the torch’s standard collet body and creates a longer, undisturbed laminar flow of shielding gas to the weld pool to reduce weld flaws caused by atmospheric contaminants. It also allows the welder to stick the tungsten out for better access in tight spaces.
Matsuo uses a 2% thoriated tungsten* for all welding because he feels it offers better arc stability and lower potential for weld contamination compared to other tungstens. For ferrous materials, Matsuo preps the tungsten by sharpening it to a point.
 |
|
Robin Matsuo stands proudly in front of his Santa Ana, Calif. shop.
|
“A tungsten is like a pencil,” he says. “Just like sharper pencils produce sharper writing, sharper tungstens provide better directional control over the arc. Dull tungstens tend to deflect the arc to areas you don’t want to touch.”
* Note: Thorium is radioactive. If you are grinding thoriated tungsten, make sure you control and collect the dust, have an adequate ventilation system at the grinding station and that you follow manufacture’s warnings, instructions and MSDS.
Choosing the appropriate filler metal and rod size is also important. Depending on the size of the repair, Matsuo uses rods ranging form .005- to .020-in. in diameter for micro-TIG and more standard diameters (.035- to 3/32-in.) for conventional TIG. Filler metal is either matched directly to the parent metal or chosen based on its hardness and final application. For example, some die makers texture a mold, giving it a design or pattern, once it has been repaired. Filler metal hardness in this case should be at or just below the hardness of the parent material to make texturing possible. Matsuo recommends consulting with end user to understand the final application and what hardness is desired from the finished weld.
Matsuo uses 100 percent argon for shielding gas for most applications. The only time Matsuo strays from argon is when he uses 100 percent helium on 6061 and 7075 grades aluminum. It’s a trick he picked up along the way that allows him to forgo preheating. He cautions anyone using straight helium to be wary of the fact that it creates a hotter arc than argon and can cause unnecessary stress and warping on the part for those with less experience.
Note that as an alternative to using expensive helium or helium mixtures when welding aluminum, some companies use welders with an advanced AC squarewave output (see side bar story for details).
Tips of the Trade
Every tool, mold and die welder approaches welding with their own unique style, which they develop after years of experience. Here are some of the “best practices” according to Robin Matsuo:
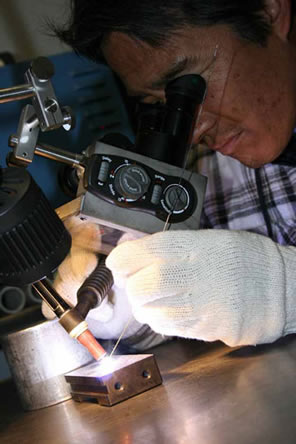 |
| Matsuo looks through the magnifying lens to perform micro-TIG welding repair on a mold for an electrical plug. |
- Always keep the filler rod in the puddle. Any time the filler rod is outside of the weld puddle, even though might be within the shielding gas envelope, it increases the risk of oxidization. If oxidized material contaminates the weld, it leads to porosity that will manifest itself as pin holes in the weld when the part is machined back to its original dimensions. Learn to continuously feed the rod and minimize breaks to reposition the rod.
- Always clip the end of the rod in between welds/passes to eliminate the possibilities of any oxidized material entering the weld.
- On multi-pass welds, use a wire brush to clean the surface between passes to avoid contamination.
- While Matsuo acknowledges that other tool and die welders peen the weld to stress relieve it, he does not do this. Instead, he relies on a properly prepared work piece and his welding technique. As a caveat, however, he notes that everyone should work within his or her skill level. “Do what works for you while always assuring the highest weld quality.” If this means peening, do it.
- To obtain fine control over heat input, Matsuo limits the maximum output of the power source, typically to 20 or 30 amps for micro-TIG welding on steel. Pre-setting the maximum amperage and using the foot control to tailor heat input prevents problems related to excess heat input, such as “sink” (shrinkage between the weld and parent steel), undercutting and warping.
- Just as preheating and/or maintaining temperatures are important with high temperature tool steels (A2, D2, etc.), carefully post-weld heat-treat these steels to guarantee a flawless end product. Use a kiln to heat and allowed to slowly cool parts back to ambient temperature to prevent cracking.
Robin Matsuo approaches his work with extreme precision and attention to detail. Properly welding each part according to its unique requirements guarantees better performance for his customers. Selecting the right equipment, processes and consumables makes that job easier. He encourages everyone to take the proper steps when welding parts themselves, or to outsource work only to experts who follow steps that ensure the highest weld quality.
TIG Machine Selection
Conventional AC/DC TIG welders, such as Miller Electric Mfg. Co.’s Syncrowave® 250 DX or 350 LX, work well for making welds .020 in. and larger on ferrous metals. Look for two key features a welder for tool repair:
- A stable arc at low amperages. Experts such as Matsuo typically work at 30 amps or less; 10 to 12 amps is more common (of course, larger and thicker sections will require higher amperages, especially those made from aluminum).
- Precise arc starts at low amperages (down to 3 amps or less). Several models of TIG welders feature customizable arc starts based on tungsten diameter and material thickness. Syncrowave units feature Syncro Start™ Technology, which lets the user select three types of arc starts: soft starts, standard starts and hot starts.
“A surge of power during arc start can melt the parent material before I even get a chance to weld it,” Matsuo says. “With a soft start, I can establish the arc, gradually ramp up the amperage, see the weld puddle form and then start applying your filler metal.”
A directional arc (focused arc cone) also helps when welding tight areas. “I need the arc to stay focused. If the arc jumps all over, it can pit other areas of the tool or unintentionally melt edges. Then I would have to add weld metal in areas that I didn’t want to.”
Advanced Technology for Aluminum
While hundreds of tool repair
shops successfully weld aluminum using conventional AC TIG technology, Miller experts note that advanced squarewave technology provides greater control over heat input, the shape of the arc cone, penetration, cleaning action, arc starts and arc stability. This technology, found in inverters such as Miller’s Dynasty® 700 and the new Dynasty® 350, can simultaneously reduce weld time and improve weld quality.
Conventional AC TIG technology enables users to adjust two functions: amperage and balance control (45 to 68 percent electrode negative). Advanced squarewave control enables much greater customization through:
- Better low-end control of the AC TIG arc, down to 5 amps.
- Extended balance control, from 30 to 99 percent electrode negative, which controls the amount of oxide cleaning.
- Adjustable output frequency, from 20 to 400 Hz, which controls the width of the arc cone and force of the arc (directional control).
- Independent amplitude control, which allows the electrode negative and electrode positive amperages to be set independently to precisely control heat input to the work and the electrode.
- AC waveform shaping, a high-end function for further control over arc characteristics.
“Companies that switch from conventional to advanced AC TIG technology for welding aluminum often experience productivity improvements of 25 percent or more,” notes Brent Williams, a welding engineer and TIG expert with Miller Electric. “For tool repair on thick sections of aluminum, independent amplitude control can solve problems related to heat input, such as tungsten spitting, and it can eliminate the need to use expensive helium shielding gases. On thin sections, adjustable output frequency provides better directional control over the arc, so operators melt metal only in area they want to weld.”
Micro-TIG
For micro-TIG welding, which is welding at very low amperages and making weld beads .015-in. wide or smaller, look for a TIG welder that can start and control the DC weld output at 1 amp or less. Micro-TIG weld systems like the one Matsuo uses feature a magnifying eyepiece akin to a microscope that allows the operator to clearly see the weldment for precise placement of the weld bead.