How to Successfully MIG Weld Aluminum [Guide]
Print Article
MIG welding aluminum can be difficult, as it is very different from MIG welding mild steel. Follow this guide to learn the key factors to consider.
The key to aluminum welding
Aluminum in its pure form is a relatively soft metal that has many uses, but which requires the addition of alloy(s) to increase its strength. Because aluminum’s properties vary greatly from steel, working with the material can present some unique challenges — such as distortion and sensitivity to heat input. Despite these issues, MIG welding aluminum isn’t that difficult when using the right equipment and following the proper procedures.
Keep in mind these important factors when MIG welding aluminum for your application.
Tips for getting started
- Consider material thickness: Material thicknesses of aluminum that can be MIG welded are 14 gauge and heavier; the output capacity of your welder determines the thickness you can weld. To MIG weld aluminum thinner than 14 gauge (.074 inch), it may be necessary to use specialized pulsed MIG or AC TIG welding equipment.
- Keep it clean: Aluminum should be thoroughly cleaned prior to welding, including the removal of any lubricants from the material. Remove oxides after degreasing using a stainless wire brush — either a hand wire brush or a cup wire brush will work. If using a power wire brush, keep the rpms and pressures low to reduce smearing the surface of the material, which could entrap oxides and impurities under the surface. To avoid contaminating the base material, always clean with a wire brush dedicated to aluminum.
- Choose the right gas: Because aluminum is a non-ferrous metal, it requires a 100 percent argon shielding gas. Flow rates of 20 to 30 cubic feet per hour are recommended.
- What process should you use? When MIG welding aluminum, the desired mode is spray transfer. This process is a very smooth transfer of molten metal droplets from the end of the electrode to the molten pool. The droplets crossing the arc are smaller in diameter than the electrode. There is no short-circuiting in spray transfer, and the deposition rate and efficiency are relatively high. However, be aware that spray transfer involves a high amount of heat, creating a large weld pool with good penetration that can be difficult to control. Don't use this process on materials thinner than 14 gauge.
- Gun and wire feeding options: Choosing a gun and wire feeding system is an important step before MIG welding aluminum. Aluminum wire is commonly fed with a spool gun or with a push-pull system. Spool guns improve feeding of soft wires by locating a small pool of wire on a pistol-grip style gun. Using a spool gun eliminates the possibility of birdnesting because the wire only feeds a few inches. With a push-pull system, a motor in the gun pulls the wire through the liner, while a motor on the feeder acts as an assist motor. This option is ideal when welding far from the power source and can be more ergonomic and user-friendly.
- The right filler metal: Know the alloy of your base aluminum and what conditions the finished part will be subjected to. The two most readily available aluminum filler wires are ER4043 and ER5356. Contact your local welding distributor or aluminum filler metal representative for recommendations on wire alloys that fit your application.
MIG welding techniques
The skill level of the operator, joint types, fit up and positions — as well as the welding power supply — will all have great influence on the weldability of the aluminum. Consider these welding techniques to help enhance your skills.
- Use a 10- to 15-degree push travel angle — tip and nozzle pointed in the direction of travel (See Figure 1). Pulling or using a drag angle will produce porous, dirty welds because of lack of gas coverage.

Figure 1: Gun techniques
- Maintain the proper tip-to-work distance and have the contact tip recessed approximately 1/8 inch inside the nozzle if possible. (See Figure 2)
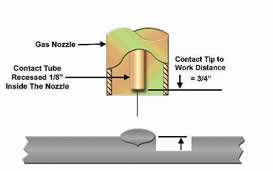
Figure 2: Gun and weld area
- The reflective heat and weld puddle are very hot when MIG welding aluminum. Holding the tip closer than recommended could lead to the wire burning back to the contact tip and other feeding problems.
- Avoid large weave beads on aluminum. If larger fillet welds are needed, multiple pass straight beads will provide better appearance and have less chance of cold lapping, burn-through and other weld defects.
- It will be necessary to increase torch travel speed as the base material becomes heated during the weld.
Troubleshooting common problems
If you run into these common challenges when MIG welding aluminum, consider these steps to address the problem.
Burn-through (melt through) caused by overheating the base material
- Increase the travel speed and make shorter welds.
- Move around on the part, spreading out the heat.
- Use thicker material, change the joint design or switch the welding process to AC TIG.
- Eliminate/reduce gaps.
Dirty welds
- Use a push angle instead of a drag technique.
- Increase the voltage to get into spray transfer.
- Use the proper base metal cleaning techniques, such as using a stainless steel brush.
- Check for proper shielding gas and wire alloy type.
Wrong machine settings
Wire burns back to contact tip during or at the end of the weld
- Maintain proper tip-to-work distance.
- Check to make sure the contact tip size, drive rolls and gun liner match the wire diameter you are using.
Wire birdnests (piles up) in front of inlet guide on gun
- Check and adjust the drive roll tension.
- Check to make sure drive rolls match the wire diameter.
- Replace contact tip if necessary.
- Check pressure adjustment on the aluminum spool gun hub.