The ability to make good welds is vital to plant maintenance. However, for many plant engineers, welding is only a part of their jobs and a skill that is practiced as needed. Following are some tips to help you keep your welding skills sharp and make high quality welds time after time. We'll focus on MIG and Stick processes here, since they're most commonly used for repairs.
Safety
If you haven't done so already, read the operator's manual for your equipment. It includes important safety information and instructions for getting the most from your welding equipment.
Even quick welds require the use of proper safety equipment: welding gloves, non-flammable pants and shoes, welding jacket, beanie or hat and proper welding helmet. Be sure to cover all exposed skin to avoid effects of arc rays.
Breathing welding fumes can be hazardous to your health. Keep your head of out of the fumes and take precautions to not breathe them in. Use proper ventilation techniques such as forced ventilation at the arc to keep fumes and gases away from your breathing zone and general area.
To make your life easier increase weld quality use an industrial grade auto-darkening welding helmet. Auto-darkening helmets help eliminate weld defects since they allow you to position the gun or electrode with the helmet down.
Before you weld
Although Stick welding is more forgiving than MIG welding on dirty or rusty metal, all welding is best done on clean material. For best weld quality clean off rust, paint and oil.
Many plant engineers use just one wire for MIG welding. The one that will give you the most flexibility is .035 in. in combination with a 75/25 Argon/CO2 gas mixture. Be sure to match your contact tube, gun liner, and drive rolls to the wire size you are using. Clean the gun liner and drive rolls occasionally, and keep the gun nozzle clean of spatter. Replace the contact tip if blocked or feeding poorly.
For Stick welding, you will usually use a 3/32-in. diameter rod for material 1/8 in. and thinner and a 1/8-in. diameter rod for material 1/8 and thicker. Common electrodes used for general work include 6010, 6011, 6013, 7018 and 7024. For better bead appearance and work on higher strength steels, use a 7018 rod. Note that 7018 rods are notoriously hard to restart if you don't break off the edge of the flux on the end of the rod first.
Your welding distributor can help you select the rods for your specific needs. If you don't know a distributor, call 1-800-426-4553 and the operator can automatically connect you to the nearest Miller distributor. You can also locate distributors through Miller's web site, www.MillerWelds.com.
Creating a Good Weld
Proper position is important. Find a comfortable position that allows you to use both hands to steady the gun when you weld. For longer welds especially, rehearse the weld beforehand to make sure you can maintain a steady travel speed, arc length and electrode angle.
Your position should allow you a clear view of the puddle and the arc. This makes it easier to read the puddle, maintain an optimal arc length and keep the electrode or wire on the leading edge of the puddle, which is important in creating sound welds.
Staying on the edge of the puddle helps insure proper penetration. If the electrode or wire is hitting the middle of the puddle, the puddle becomes an insulator and no longer penetrates as deeply.
To create a solid, cosmetically appealing weld, it is important to maintain a constant travel speed. You don't want to dwell on a specific spot of the weld too long because it creates an uneven bead profile.
To judge whether you're going too fast or too slow, watch the width of the bead. If you're going too slowly, the arc will strike the puddle, which will absorb the arc force. The arc will not penetrate to the base metal, leaving a wide weld bead with poor fusion. On the other hand, if you're going too quickly, there is not as much heat input into the weld, reducing the melting of the base metal. This leads to a thin weld bead, which also has insufficient penetration. Usually, the best travel speed is one that puts the arc at the puddle's leading edge once the bead width is established.
In the flat position, the "back stepping" technique helps achieve the "stacked dimes" look. In this technique, you position the arc so it strikes at leading edge of the puddle to ensure good penetration then you back up to the middle of the puddle to fill and out again to the leading edge, advancing each time.
 |
|
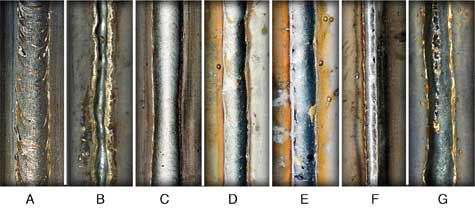
A: Good Weld; B: Travel Too Fast; C: Travel Too Slow; D: Voltage Too Low; E: Voltage Too High; F: Amperage Too Low; G:Amperage Too High
|
Stickout and Arc Length
In MIG welding, it's important to maintain the proper stick-out(the length of the electrode extending from the tip of the contact tube. In short circuit MIG, the optimal stickout is from 1/4 to 3/8-in. If it's longer than that, the extra length of wire acts as a large resistor. Arc amperage and penetration will decrease, resulting in lack of fusion, poor starting, and the electrode may no longer be cover ed by the shielding gas, leading to porosity in the weld.
Note that when starting a weld, a short stickout helps ensure a good, hot start; a longer stickout - once you've established the arc - can help bridge a gap when encountering poor fit-up.
If the distance is too short, you risk an excessive amount of spatter coming back into the nozzle, which could lead to wire feeding problems.
In Stick welding, the correct arc length varies by the diameter of the electrode. In general for 1/16 in. and 3/32 in., use an arc length of 1/16 in. For 1/8 in. and 5/32 in. use an arc length of 1/8 in.
Gun and Electrode Angles
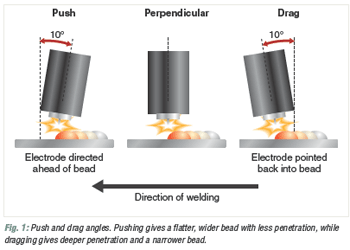
In MIG welding, there are three common gun angles in relation to the direction of travel: perpendicular (where the wire is fed straight into the puddle), push (where the gun is tipped away 10-degrees from the direction of travel) and drag (when the gun is tipped 10-degrees with the direction of travel).
Pushing gives a flatter, wider bead with less penetration. This technique is commonly used to prevent burn through on light gauge material. The dragging technique, used on thicker material, provides deeper penetration with a narrower bead and more buildup. In Stick welding, hold the electrode at a 5- to 15-degree angle and always drag it.
 |
|
Push and drag angles. Pushing gives a flatter, wider bead with less penetration, while dragging gives deeper penetration and a narrower bead.
|
Welding in the Flat Position
In the flat position, the work angle (the angle perpendicular to the direction of travel) on a flat weld, such as a butt joint, should be 90 degrees to the workpiece, directing the filler metal straight into the joint. A weaving pattern (a back and forth motion perpendicular to the direction of travel) can help fill a large gap or when making multiple passes.
On a fillet weld, maintain a work 45-degree work angle or equal distances from each piece. When making multiple weld passes, change the work angle slightly to avoid uneven weld beads and undercut.
Welding Out of Position
Ideally, all welding would be done in a flat position. In out-of-position welding (horizontal, vertical and overhead) gravity is working against you, pulling the puddle down. In out-of-position MIG welding, using slightly less voltage and wirefeed speed helps lead to a smaller puddle and better control.
 |
When welding out of position, find a position that allows you to maintain the proper stickout as well as see the puddle and arc.
|
Horizontal
In the horizontal position, a push or drag technique can still be used, but work angle is usually dropped 0- to 15-degrees to counteract the effects of gravity. Traveling too slowly or with too large of a wire will put more metal into the puddle, causing it to sag.
Use a back and forth weave bead on thicker metal when making multi-pass welds, or to bridge a slight gap where fit-up is poor. A slight hesitation at the top toe of the weld helps prevent undercut and ensure proper tie-in of the weld to the base metal.
Vertical
The vertical down position is usually used on 3/16-in. and lighter, cold rolled steel because the arc penetrates less and helps eliminate burn through. In this position the puddle can easily get ahead of the arc, which means the arc is no longer on the leading edge and no longer hitting the base metal. Then the puddle becomes an insulator and you lose penetration. You'll have to travel fast to stay on the leading edge.
Use a vertical up technique on hot-rolled steel and cold-rolled steel 3/16 in. and thicker, to get deeper penetration.
When creating a fillet or groove weld using in the vertical up position, a side-to-side weave technique may be used. Manipulating the arc from the right, to the center, to the left, in the form of a triangle, lets the corners of the triangle cool so the puddle isn't too molten and allows a good foundation for the next pass. Pausing briefly at each side of the joint provides good fusion.
Overhead
For overhead welding, you may have to turn down the heat, move quickly and keep the weave narrow so the puddle remains small and the metal will not fall out of the joint. Keep out from underneath of the weld puddle and make sure you are wearing the proper safety gear, your jacket is completely closed and wear a welding beanie.
Equipment
 |
|
Lightweight inverters allow you to take MIG welding to the work.
|
Keeping these tips in mind will help you attain consistently good weld results. However, the proper choice of equipment can make it even easier. If you haven't updated your welding equipment in the last few years, take the time to see what's available. Inverter technology puts a very high quality arc into lighter weight packages for increased portability, better puddle control, easier set up, increased cost savings and decreased likelihood of weld defects.
A multi-process inverter, such as the Miller XMT series, provides excellent Stick, TIG, MIG, flux cored and gouging capabilities, while an all-in-one MIG welder, such as the Millermatic® Passport™, can weigh as little as 50 lbs. and allow you to take a high quality MIG arc to where the work is. Even non-inverter welders have improved. The Millermatic 140 with Auto-Set™, for instance, takes the guesswork out of setting parameters and allows the user to focus on proper gun technique.
For more welding tips and safety information, visit MillerWelds.com