How to Build an Aluminum Sled
Print Article
Metal artist Tom Patsis of Cold Hard Art shares how to create a snow sled out of aluminum with a TIG welder.
Winter welding project
In this project we will be building a custom snow sled for a toddler (aka my daughter Luna). The first step is to define the measurements of the sled. Remember to keep in mind the size of the person you’re building it for. You will want to get the length from their back sitting down to the bottom of their feet. Also measure their waist and, as they are sitting, from the table to their waistline. Once you've gotten the measurements, you're ready to start designing the sled. This sled project requires a fair amount of welding, but keep in mind how much fun this special keepsake will be for future generations.
Tools used in this project:
Materials used in this project:

The first step is to convert your sketch into scaled flat patterns that you can use to start making the parts. My tip is to put a centerline on everything you draw out. This will allow you to draw half of everything and will ensure everything is symmetrical.
When converting your measurements into building notes, be sure to include some extra width and length to allow for their bulky snow suit and boots — and to extend the life of your sled as they grow. These measurements are specific to my little girl, so modify as necessary.

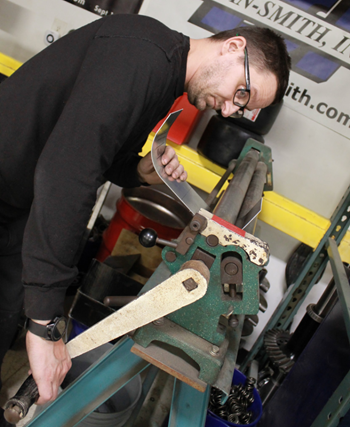
Use a die to bend the outer perimeter of tubing according to your measurements and the shape you want. The tubing will provide strength to hold the shape, a safe edge and a universal hand grip. I chose this shape because I had an old plastic sled I loved when I was a kid, and it was tapered with a big front end. The bottom had a lot of surface area to help prevent it from sinking in the snow — resulting in more riding on the top crust. Less drag, more speed.

With the tubing bent we can now trace the inside of the tube onto the poster board to give us our first flat cutting pattern. To get the front radius I used my scale (long SS flexible ruler), held it at both ends and traced. If you don't have access to a tubing roller you can skip the radius front end and do a straight cut on the sheet metal and piece of tubing.
Make sure you take your time and cut straight lines, as these are the templates you will be tracing around. If you do every step as perfectly as you can, it will make the next step that much easier to follow. Even after you trace this out onto the aluminum, make sure you don't throw any of the templates away. You might need them again later.

If you can utilize a straight edge when tracing out the cut pattern it's one less step you have to do. Plus if you don't have a stomp shear and have to use hand shears or a beverly shear, it will really save you some trouble. That's why I used 4043 -.065. It's just soft and thick enough to hold its shape with some abuse, but not too thick and hard that you can't form or cut it with some hand tools. Plot everything as close as you can to avoid wasting metal.
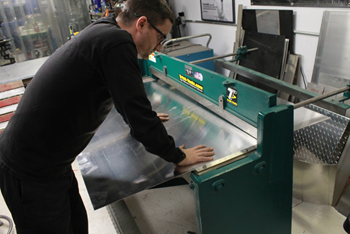
Cut all the straight edges on the stomp shear and finish off the curved edges on the beverly shear. Afterward, make sure you use a hand file to deburr all edges. You will be handling this piece a lot, and the last thing you want is cuts on your fingers and palms.

Now it's time to cut the back pieces. These will be cut at about 5 inches tall (that will put the upper edge a little over the top of her waist to help hold her in and not make her uncomfortable). Plus, we’re going to keep this piece a bit shorter — just long enough to roll around the entire radiused edges and stop on the flat of the straight sides.
Next, with the help of our centerline, we can plot out where we need to start and stop our rolled edges, so when we go over to the slip roller we are not guessing.
Adjust the slip roller so you don't bend the piece too much; instead, bend it slowly. When you get done with the first bend make sure to reset the rollers.

The tighter you get the bends to your sheet metal shape, the less you have to push the pieces together. A tighter fit gives you a better chance of fuse tacking it at the start, with no need for a third hand.
Next, we need to roll the front edge in the slip roller. For this I started rolling 12.5 inches from the back straight edge forward because it gave it the look I wanted, and it gives it enough flat on the back that when it’s sitting on the ground it doesn’t rock.

TIP: I was taught to use a hand file on every edge you plan to weld to help reduce the risk of contamination, since a hand file only takes material away. You can't get the edge clean enough.
So right now we are only tack welding the piece. We want to put small tacks because you don't want them showing in the final weld or to waste time grinding them down, risking grinding marks. If you did a good job on tight fit, no filler rod will be needed. You can fuse two pieces of .065 together at 90 amps with committed stab of the pedal every few inches.
Now that we have the back end tacked in place and the front end curved where we want it, we can trace the sides out onto the poster board. As long as you paid attention to the details, you should only need to draw out one of the templates for both sides.
To create the side panels, we need to do more shearing of the aluminum. Don't forget to peel off the protective plastic of the aluminum, as that will really mess up the finish.
Before you weld these in place consider adding a few rolled beads down the sides to liven up the flat surface. I just measured up every 3/4 inch and plotted out three lines with starts and stops to roll on both sides of the sled.

Now add small tacks every few inches to bring the front and back together. This can be a one-person job with ease if you followed your lines with care. If not, you will be either pushing to tighten up a gap or needing a second person to hold it in place.
Now it’s time to marry the 3/4 tubing that will help make this sled very rigid. But before any welding is done, you’ll need an inside centerline on the tube to align the top of the sheet metal to keep the tubing level. Instead of contaminating the metal with a marker line, an easy trick is to take something flat with an edge and drag it down the inside of the entire tube.
Now that you will be tacking a thin edge piece of .065 to a thicker piece of .083 tubing you will need a little more juice. Bump up the amperage to 130 and focus your heat into the tubing and not the edge. Still aim for a small tack.
Next, use a tubing roller to adjust the front bumper. Slowly move the sled back and forth to match the radius of the tube to the sheet metal. Be sure to make the rolled part longer than needed for a proper fit. If you don't have access to a roller, leaving the back of the sled straight across will work just fine.
After tacking both sides in place, put two more tacks around the tubes. Again on the sheet metal, focus more heat on the tube with smaller tacks. Before we start TIG welding, make sure no other tacks have pulled apart, and wipe down all the welding areas with alcohol.

The first place that needs to be fully welded is the two front tube joints (you don't want all the heat pulling those apart, so lock them down fully). It will take about 175 amps to get full penetration. The next place to weld is the sheet metal to the tubing from one end to the other at 145 amps. Then we move just next door. The same amps will be used for welding the tubing to the sheet metal all the way around the entire inside top. After that, weld those two short vertical pieces from bottom to top on both sides starting with the inside then moving to the outside at 95 amps. Now, with the intention of welding both sides of the footprint of the sled, we’ll start with the entire bottom side at 95 amps. This is because when we start to weld the top (at 110 amps) it will most likely ugly up the bottom welds due to penetration (plus it will naturally get beat up from dragging on the ground).
After completing all the welding (it took me about two-and-a-half hours with a little bit of cool down time between major welds) you should be ready to move to the last step before the fab work is complete — adding guide rails to the bottom of the sled.

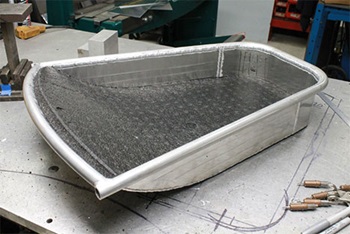
I made the guides out of a slightly thicker aluminum (.090 thick) just to help extend the wear life. Using clecos to temporarily hold your guides in place while you drill your rivet holes will make your life much easier. I chose solid rivets to fasten the guides in place. Not welding the guides helps prevent any major warping of the bottom. Plus, it gives you the opportunity to easily replace the guides if your sled gets more passes than expected in its life. Now you have a very solid sled that might even double as a boat.
Remember when I told you not to throw away those templates? Well this is why. I wanted to add even more custom comfort by making a padded bottom with some durable closed cell foam. By tracing out the pattern on the foam you get a nice matching fitted pad. Once that is complete, push a piece of rope through the open end of the tubing and magically it will come out the other end. One knot later and it’s ready to go.

Now you have a very solid aluminum sled that is ready to be used. Have a fun 2020 winter with your kids, and maybe your kids can share something you made with their kids one day!
About Tom Patsis
Tom Patsis is a full-time metal artist and owner of Cold Hard Art. After studying automotive technologies in high school and earning his degrees in automotive, high performance and alternative fuels at the University of Northwestern Ohio, Tom moved to Indianapolis to work for Don Schumacher Racing. He spent six years with the Pro Stock team before he switched to working in the fabrication shop. It was there that he got started with metal art by welding and building for practice — later opening up his own shop to use as an outlet for his creativity.
Feeling inspired? Check out our project page for more DIY welding projects, including step-by-step guidance, videos and downloadable plans.
CHECK IT OUT