Article
Choosing What Filler Metal To Use for DIY Welding Projects
No matter the welding process or material, here are six questions to help determine what filler metal to use for your home welding projects.
Understanding the four basic welding positions can help you choose the right filler metal and welding process for your job. Each welding position may require different techniques, parameters and preparation to achieve the best results.
Learn more about the different welding positions and get some best practices for welding each type.
The four basic welding positions for fillet and groove welds are:
Master the four welding positions with our free reference poster — 1F through 4G, fillet and groove welds at a glance.
To help operators understand the type of weld joint (fillet or groove) and the weld position, each weld is given a number and a letter — 1G, 2G, 3G, 4G or 1F, 2F, 3F, 4F — to indicate the position and the type of weld required. Here’s what they mean:
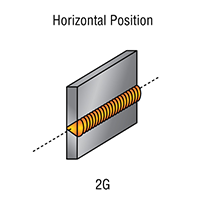
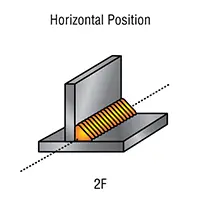
A fillet weld joins together two pieces of metal that are perpendicular or at an angle. A groove weld is made in a groove between workpieces or between workpiece edges. Using this system, a 2G weld is a groove weld in the horizontal position.
Welders are likely to see these designations in a welding procedure specification (WPS). They are also found on filler metal data sheets, which call out the positional capabilities of specific filler metals.
Filler metals are designed for use in all positions, while others are restricted to flat and horizontal usage only. The numeric designation on the filler metal is what indicates a filler metal’s positional capabilities, e.g.:
E70T-XX: The zero indicates the electrode can only be used in flat and horizontal positions.
E71T-XX: The one indicates the filler metal can be used in all positions.
The filler metal, welding process and transfer mode you use are what determine the welding position. The following are general guidelines for processes and modes of transfer:
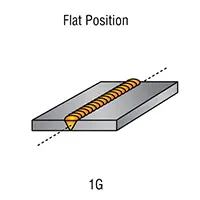
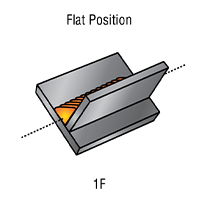
Flat welding is generally an easier position to weld in because you’re not fighting gravity. The weld puddle stays fluid and wets into the joint evenly, which allows operators to run hotter with higher deposition rates.
You can use any welding process to weld in the flat position. Just be sure to apply the recommended techniques for your chosen process. For example, with stick welding, consider using a drag technique rather than a push technique to manage the slag effectively.
The proper work angle for a flat position weld varies with the weldment type (1G or 1F). If the wire or electrode sits off to one side or the other vs. being centered, the heat won’t be focused where the two pieces come together, and you may get incomplete fusion.
In a horizontal weld, the weld axis is roughly horizontal. Welds in the horizontal position share many similarities with flat position welds. You can also use any of the welding processes in the horizontal position.
A 2G weld position is slightly more difficult than a 2F weld position. The 2G weld happens in the middle of the workpiece where it can be more challenging to control the weld puddle, whereas the 2F provides a bottom shelf to ensure the weld puddle doesn’t get out of control or sag too much. To combat the effect of gravity on the weld puddle in a horizontal groove weld, favor the top edge of the joint slightly with the work angle, knowing the puddle may sag a bit. In a horizontal fillet weld, keep a 45-degree angle to the joint to focus the heat where the two pieces come together.
Avoid running too hot in horizontal welds to prevent the puddle from becoming too fluid. Tweak your weld parameters to make sure the puddle doesn’t get too hot or too fluid.
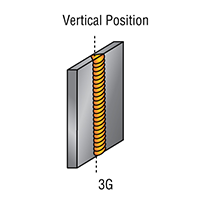
Vertical welding can be done either vertical up (moving bottom to top in the weld joint) or vertical down (moving top to bottom in the weld joint). Vertical up is typically more common, especially on thicker materials. You may need to use this when working on a large weldment that you can't easily move into the flat or horizontal position.
When welding vertically, the puddle will naturally tend to sag — so applying the same techniques and parameters ideal for flat and horizontal welds on a vertical weld is unlikely to produce a quality weld.
Rather, to achieve the best results in vertical welds, adjust the weld parameters. Use a reduced wire feed speed and voltage, which will help ensure keep the puddle from falling out of the joint. If you’re using a welding power source with Auto-Set™ technology, be sure to use the parameters designed for a thinner material, even if you’re welding thicker base metal. This helps keep the heat input lower to fight gravity.
For a 3G weld, use a 90-degree travel angle, and for a 3F weld, use a 45-degree angle.
Slowly manipulate the puddle in a way that washes it to each edge of the joint. Going straight up with a vertical weld will typically result in a ropy bead that doesn’t wash into the edges well. Instead, hold the toes of the weld longer and quickly move across the middle of the puddle as you travel up. Welders can use several common techniques for this puddle manipulation — including a zigzag motion, an upside-down T or repeated triangles stacked on top of each other — depending on the operator's preference.
In vertical welding, it’s important to make sure you’re in a comfortable position before starting to weld. Practice first on scrap material to make sure the parameters and technique you’re using produce the results you want. That way you can make any needed adjustments before welding your workpiece.

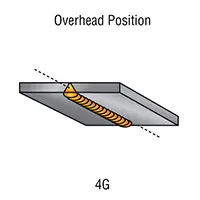
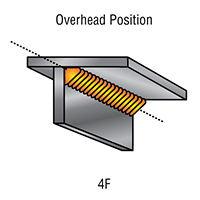
Overhead welding is often necessary for fixed equipment or immovable metal. Operators may find themselves lying on the ground or floor of their shop for overhead welding, so it’s important to find the most comfortable position with a range of motion.
The same techniques used for vertical welding often apply to overhead welding. A 4G weld will require a slight weave or manipulation of the weld puddle to wash in at the toes better, similar to a vertical weld. You'll also want to dial back parameters to run cooler with overhead welds. This prevents the weld puddle from becoming too fluid and potentially falling out of the weld joint and onto you.
When welding in the overhead position, sparks will drop down. You may want extra protection on the top of your head, such as a bandana under your welding helmet. Use a fully leather welding jacket, especially with a process like stick welding, which produces more sparks and spatter.
Perfect practice makes perfect. It’s always a good idea to do a few practice passes to make sure you can complete the entire weld in a comfortable position. If you’re not in a comfortable position, it can result in an inconsistent weld.
Remember, your choice of filler metal and mode of transfer will determine the welding positions you can use. If you need to weld overhead or out of position, be sure your filler metal is suitable for those conditions and adjust your weld parameters accordingly.
To learn more about the five basic types of weld joints and how to improve your results, check out this article.
No matter the welding process or material, here are six questions to help determine what filler metal to use for your home welding projects.
Regular welder maintenance will keep your machine performing in top shape. Follow these guidelines for common welder maintenance tips.

Learn about duty cycle in welding, its importance, and how it impacts your workflow. Ensure optimal performance and safety with the right duty cycle.