Furniture making
I’ve had an interest in making furniture for a long time, and I like to incorporate design influences from sources like aircraft and race car construction. Minimizing weight is crucial in these fields, and this is often done by placing lightening holes in metal components.
While weight isn’t much of a concern for furniture, design is very important, and I love the look of having certain elements peppered with holes. Before I embark on a project like this, I always do several mock-ups — trying different hole sizes, spacing and patterns. Typically, the more holes I use, the better it looks!
Today’s project is making an end table from aluminum sheet metal, with a glass top. The material is 3003 H-14 aluminum and 1/16-inch thick. I like to feature the natural “mill” finish on the material, so when I order from my supplier, I pay extra to have the sheets protected on one side with PVC film. I handle the material carefully through all the steps to prevent any unnecessary marking.
Some of the welds are concealed on this project, but the exterior corner welds are exposed, so my plan is to sand them smooth. It’s extremely important to have good, sound welds in these areas with absolutely NO porosity. I’m using the TIG function on my Miller® Multimatic® 220 AC/DC multiprocess welder, which does a superb job on aluminum.
Before any metal is cut, I need to know exactly where the holes will be placed. The dies that punch and flare the holes have a 1/4-inch-wide border around the flare, and this limits the minimum hole spacing. In some areas, the dies require additional room to clear features like flanges, or I may spread the holes farther apart to maintain uniform hole spacing on a part of a given length. Not only is the spacing between holes important, I also need to consider the distance from the hole to the edge of the part.
Once the hole sizes and positions have been determined, I can make a layout for each component, which includes the location and width of any flanges. Next, I cut the blanks for each component, lay out the holes and mark the bend lines for the flanges. I also note the angle of each bend.
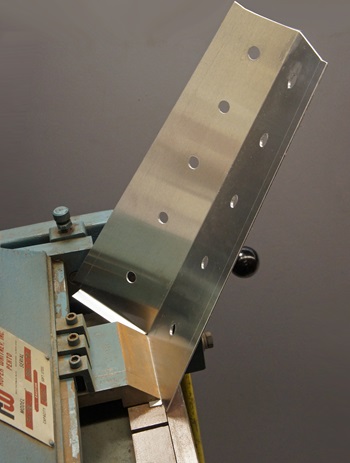
With the blanks for the tabletop laid out and cut to size, I can make pilot holes for the oval punch and flare dies. The bends are made first and the holes punched later — otherwise the bending brake would crush the flares around the holes. Here’s one edge of the tabletop after bending.
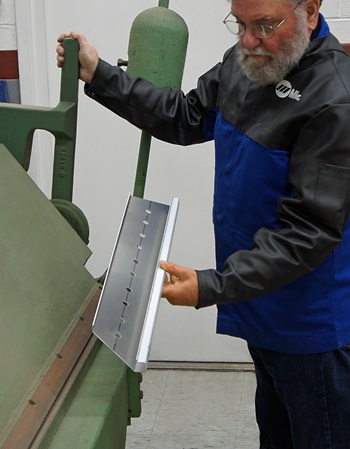
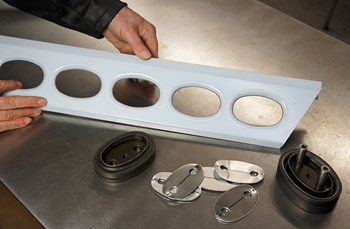
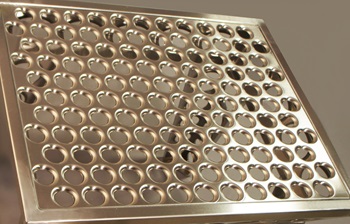
With the profile bent on all four sides of the tabletop, the 2 by 3-1/4-inch oval holes can be punched using an H-frame press. You can see the male and female parts of the dies and the slugs that were punched from the holes.
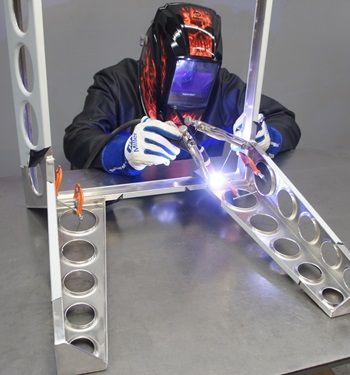
Now the mitered corners for the tabletop can be jigged up and welded together. I’m using my welding table to align the edges of each component, and a carpenter’s square to check the angle at each corner. The corners are tack welded, then everything is double-checked before finish welding.
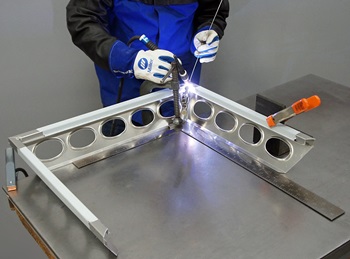
Once I’m satisfied with the alignment, the joints can be finish welded. I select “TIG Aluminum” from the control panel menu, and, using the Auto-Set™ Elite feature, I select my 3/32-inch tungsten diameter and the 16-gauge material thickness, which automatically sets the machine to 95 amps. I use 2 percent ceriated tungsten (color coded grey) for just about all my welding, ground to a sharp point. I’m using 1100 alloy filler rod, 1/16-inch diameter. The Multimatic 220 machine gives me great control and lays down a beautiful weld.
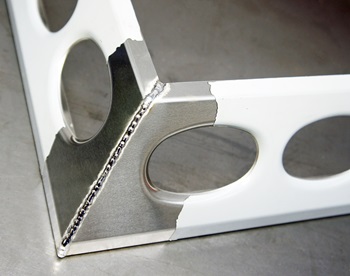
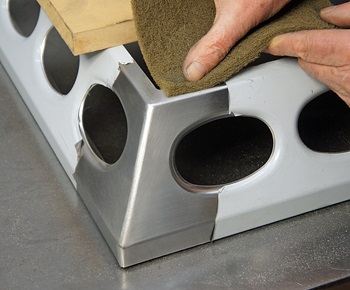
After the welds are completed, I use a hand-held sander with 100-grit abrasive to remove the bulk of the weld and then sand each joint with progressively finer abrasives to blend the joint in with the mill finish.
Next, I’ll make the legs. As before, the blanks are cut, and the location of the holes for the punch and flare dies are marked and drilled. I used a box and pan brake to make the small flanges on the top of each leg. The long bends are made in the leaf brake.
I’m using five sizes of holes for each leg — starting with 1-1/4 inch and graduating up to 2-1/2 inches.
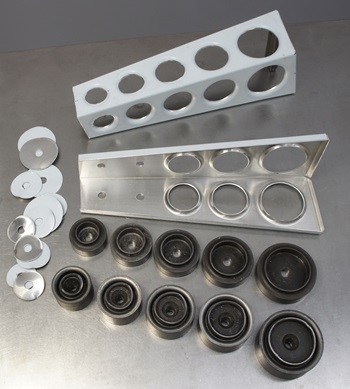
After the holes are punched and flared, I cap the bottom corner of each leg to finish it. I’m using 1/8-inch-thick aluminum for the caps.

After each welding joint is sanded flat and the surface finish is blended, I use several grades of abrasives to get the final finish.
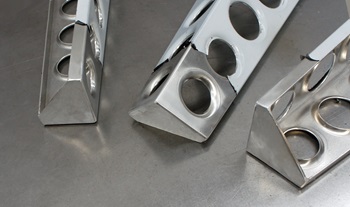
Now I can join the table legs to the top. My design places the welds on the inner edge of the flanges, so no weld cleanup is needed in the valley between the leg and the top. This will make a crisp, clean joint.
To make a good edge weld, it's very important that the metal is squeaky clean and the parts need to be clamped tightly together. I did my best to keep the tungsten perpendicular to the edge — although this was challenging because of the confines I was working in.
I originally planned to use a piece of glass for the tabletop, but once I reached this point, I hatched the idea of incorporating a sheet of metal perforated with more holes. I think this adds a nice touch to the table design, and placing a sheet of glass over the holes will provide a smooth surface and prevent small objects from falling through.
Here’s the completed table, and I’m absolutely thrilled with the end result. This table will fit at the end of a sofa, and I look forward to making a larger coffee table with a similar theme.

I encourage each of you to think about using holes as a creative design element for your future projects. Hint: For heavier materials, you can make a lot of holes quickly with a plasma cutter, such as the Spectrum® 375 X-TREME™ plasma cutter, and you can often use found objects (like washers) as a template to guide the cut.
About Ron Covell
Ron Covell is a talented welder and metalworker in the automotive industry. Covell is a contributor for Hot Rod Network, where he has a popular column titled, "Professor Hammer's Metalworking Tips." He also owns Covell Creative Metalworking, offers instructional metalworking DVDs and hosts workshops around the country.